Piano Tuning & Repair Books of Montal's time
A couple books on the subject of piano tuning and repair written in English were published at approximately the same time as Montal's book appeared, as was one written in French, These are provided here to give an idea of how detailed and comprehensive Montal's book was for the time. We also provide a translation of Montal's first, much shorter book, that he published in 1834.
Montal's Abridged Art of Tuning Your Own Piano Yourself, 1834
This book was quite short, 28 pages, covering only tuning, and doing so more succinctly than in the much longer book of 1836. It was prepared for the Grand Exposition of 1834, where it was sold in the exhibits of various piano manufacturers, whose pianos Montal tuned. It was so successful that he created a new edition, which he called Abrégé de l'art d'accorder soi-même son piano (Abridged art of tuning your own piano yourself) and in which he announced the upcoming appearance of his later, longer book. It was also published in translation by the German publishing firm, Schott, in 1835, and published in Czech in 1836. A Dutch version appeared in 1847, and it is quite likely that there may have been others. These three translations survived and are in various libraries. A new English translation by Fred Sturm (presumably the first) may be downloaded here, or read on line (or copied as text) below the download buttons. The original plates, musical examples illustrating the text, are included in the pdf, and are available as jpg files at the end of the text version. [Adobe Acrobat document, 1.5 MB]
Hamilton's Art of Tuning the Pianoforte
This file is a scan of a fairly late, revised edition of a book first published probably in the 1830s, perhaps as early as the late 1820s, so it is roughly contemporary with Montal's much more detailed and comprehensive book. The original author, James Alexander Hamilton, published many books on various musical topics, and was not a professional piano technician himself. Later editions added chapters or expanded existing ones. Since the Tuners Guide (below) plagiarized Hamilton, it seems likely that the sections that are identical in the two books were in the original or at least an early edition. This pdf was made from a microfilm created by the NYC Public Library.
Since this is a pdf, there is no text file below. [Adobe Acrobat document, 5.0 MB]
The Tuner's Guide
This book was originally published in England, probably during the 1830s or 40s, and much of its content plagiarizes Hamilton's Art of Tuning (above). Its main topic is tuning and temperament, but it also contains some instructions on basic piano repairs, which is quite distinct from that contained in Hamilton. This scan is from an edition printed in Boston in 1852. It is presented here to offer a basis for comparison with Montal's much more detailed and comprehensive work.
As this is a pdf file of a scan, there is no text pasted below. [Adobe Acrobat document, 7.1 MB]
Manual of the Art of Tuning Your Own Piano Yourself
deduced from rigorous principles of acoustics and harmony;
A work useful to all people who are occupied with music, and especially those who spend part of the summer in the country.
By C. Montal
Former teacher at the Institute for Blind Youth, founder of the course in tuning, and tuner for the most celebrated professors of the Conservatory.
net price 2 francs
in Paris, at J. Meissonier, publisher, merchant of music, rue Dauphine, no, 22 and from the author, rue Poupée, no. 11
1834 [Translated by Fred Sturm]
This manual is an extract from a work on the same subject that I am preparing for publication. I intend this little work particularly for people who don’t have time to devote to study, and, assuming that they already know the principles of music, and a little about the interior of the piano, I have neglected to speak of those subjects, and have only covered succinctly the details of my method, focusing only on the partition and counter partition, which, I believe, are entirely my own, both in the path that I follow and in the proofs that I use, and which have consistently given me happy results with all the students to whom I have taught them. Up until now, it seems that people have done all they could to keep the art of tuning from being popularized. The partitions that have been given to the public, containing no sort of explanation, and all being based on more or less absurd principles, are composed most often of a bizarre mixture of ascending and descending fifths, which form a labyrinth in which everybody gets lost.
That being the case, is it any wonder that of all musicians, only pianists imagine that they can’t tune their own instrument!
Chapter 1
Correspondence of the tuning pins with the keys of the keyboard, etc.
The first difficulty facing people who wish to tune their own piano consists in finding the correspondence between the tuning pins and the keys of the keyboard to which they belong; however, nothing could be simpler, as will be seen by what follows:
Each string is held at one end by a tuning pin that serves to raise and lower its pitch.
The tuning pins are placed obliquely two by two or three by three for each unison, depending whether the piano is double or triple strung; i.e., the first string, that is among bass strings of the piano, corresponds to the first tuning pin on the left of the group, the second string to the next tuning pin, and so forth.
The relationship of each group of tuning pins with the corresponding key of the keyboard is indicated by one of the first seven letters of the alphabet – A, B, C, D, E, F, G – designating the notes la, si, do, re, mi, fa sol; the same notes when sharped are indicated by the same letters accompanied by the sharp sign.[1] . So the chromatic scale is indicated in the following way: la, A; la-sharp A#; si B; do C; do-sharp C#; re D; re-sharp D#; mi E; fa F; fa-sharp F#; sol G; sol-sharp G#; la A; etc.
In square pianos, the groups of tuning pins are placed two by two in the same oblique line; thus, these lines are composed of four or six pins, depending on the number of strings in each unison. The la of the tuning fork, in these pianos, is in the seventh group to the right, descending, i.e., the third marked with the letter A.
The tuning hammer is a tool used to turn the tuning pins.
The wedge mute is a piece of felt about half and inch wide and two inches long, narrowed on its two sides toward one of its ends, which you place between the strings to damp them, so as to leave only the string you want to tune free to vibrate.
Chapter 2
Temperament, the perfect chord, just and appropriately tempered.
You must begin the study of tuning by training the ear to recognize the perfect justness of unisons, octaves, fifths, fourths, major thirds, the perfect chord, and the six-four chord in three parts, contained in figure 1, as well as others that can be chosen as you wish.
The piano would be easy to tune if you only needed to recognize just intervals, but that is not the way it is.
Tuning a piano requires us to reduce to twelve the 35 tones of the physical scale; that is the source of the difficulty.
The physical scale, used by the voice and by flexible pitched instruments like the violin, the bass, etc., is made up of 35 tones, while in fixed pitch instruments, like the piano, the scale is composed of only twelve different tones, made by the seven white keys and the five black ones. This obliges us to find mean semi-tones, which make the difference between diatonic and chromatic semi-tones disappear. We know that musicians divide the interval of a whole step into nine equal parts called commas; we also know that the sharp raises a tone by five commas, and the flat lowers it by the same quantity. Thus, from C to C-sharp, a chromatic semi-tone, there are five commas; from C-sharp to D-natural, a diatonic semi-tone, there are only four; from D-natural to D-flat, a chromatic semi-tone, there are again five commas; from D-flat to C-natural there are no more than four. (See fig. 2).
You can see then that since from C to D-flat there are only four commas, and from C-natural to C-sharp there are five, C-sharp and D-flat are not the same thing, and different from one another by one comma. However, there is only one key on the piano to give the two tones, and consequently it is necessary to alter both to obtain two mean semi-tones, each composed of four and a half commas.
Mean temperament is the name given to the operation consisting of reversing in a uniform way the alteration of certain intervals, so as to divide the octave into twelve equal semi-tones, which makes all the tones equally just, or more precisely equally false; for none must be rigorously just, but only tolerable.
The process of creating this alteration needs only focus on the three consonances: the major third, the minor third, and the fifth. All other intervals will be found tempered naturally. Only the octave must be rigorously just, the major third wide,[2] the minor third and the fifth narrow. From this it follows that their inversions will be altered in the contrary direction, i.e., the minor sixth will be narrow, and the major sixth and fourth will be wide. (See fig. 3)
The alteration of the other intervals is entirely subordinate to those of the consonances we spoke of, and we needn’t worry about them.
Major thirds must be wide, so that the three thirds C–E, E–G# or A-flat, and A-flat–C will make a just octave; because if all three are just, the octave will be narrow. The minor third must be narrow so that C–E-flat, E-flat–G-flat or F-sharp, F-sharp–A, A–C make a just octave instead of one that is too wide.
We narrow the fifth by lowering its upper tone, in such a way that four ascending fifths[3] C–G, G–D, D–A, A–E will make with C, the point of departure, and having lowered the E by two octaves, a major third that is neither too wide, nor just, but tolerable; i.e., it must have the same width as one of the three that form the just octave. (See fig. 4).
In the same way, if we tune the fifths narrow by raising the lower note - as in A–D, D–G, G–C, C–F - the F of the fourth fifth will make with A, the point of departure, lowered two octaves, a major third F–A as wide as the C–E produced by the four ascending narrow fifths.
After having understood these changes, you should exercise your ear to temper the perfect chord C–E–G, first by narrowing the fifth C–G, raising the C only so much as to disturb the perfect justness of the fifth, and then tuning the E to the C, so as to obtain a wide C–E third, as we have indicated, and the entire chord C–E–G must be very tolerable.
After the key of C, you should practice equally in other keys (see fig. 5). You should apply this also to tuning the tempered six-four chord, widening the fourth G–C and the third C–E so that the entire chord G–C–E is quite tolerable. And the same for other keys (see fig. 6).
Chapter 3
Partition
The term partition is applied to the sequence and the means by which we create the temperament in about an octave and a half around the middle of the keyboard.
The fifth is the interval that works best for creating the partition, because of the ease with which the ear can hear the different nuances of alteration we need to give it.
My partition is made from an uninterrupted series of twelve descending narrow and equally tempered fifths, of which the last rejoins the first, and which for that reasons forms the harmonic circle. (See fig. 7).
This succession of uninterrupted descending fifths is much preferable to all the sequences used up to now for creating a temperament; its proofs serve as a guide during the course of the operation and present themselves naturally. Each fifth, being narrowed by raising the lower note without interrupting the movement of the tuning hammer, allows the ear to hear the impression of the just fifth that serves as a standard of comparison, from which to introduce the proper degree of alteration.
The proofs I use to guide the ear in the partition are the major third, which is very sensitive to change, the fourth, the perfect major chord in three parts, and especially its second inversion, the six-four chord, in which the major third, being on top, dominates the other parts and makes it easier to perceive the alterations introduced into it.
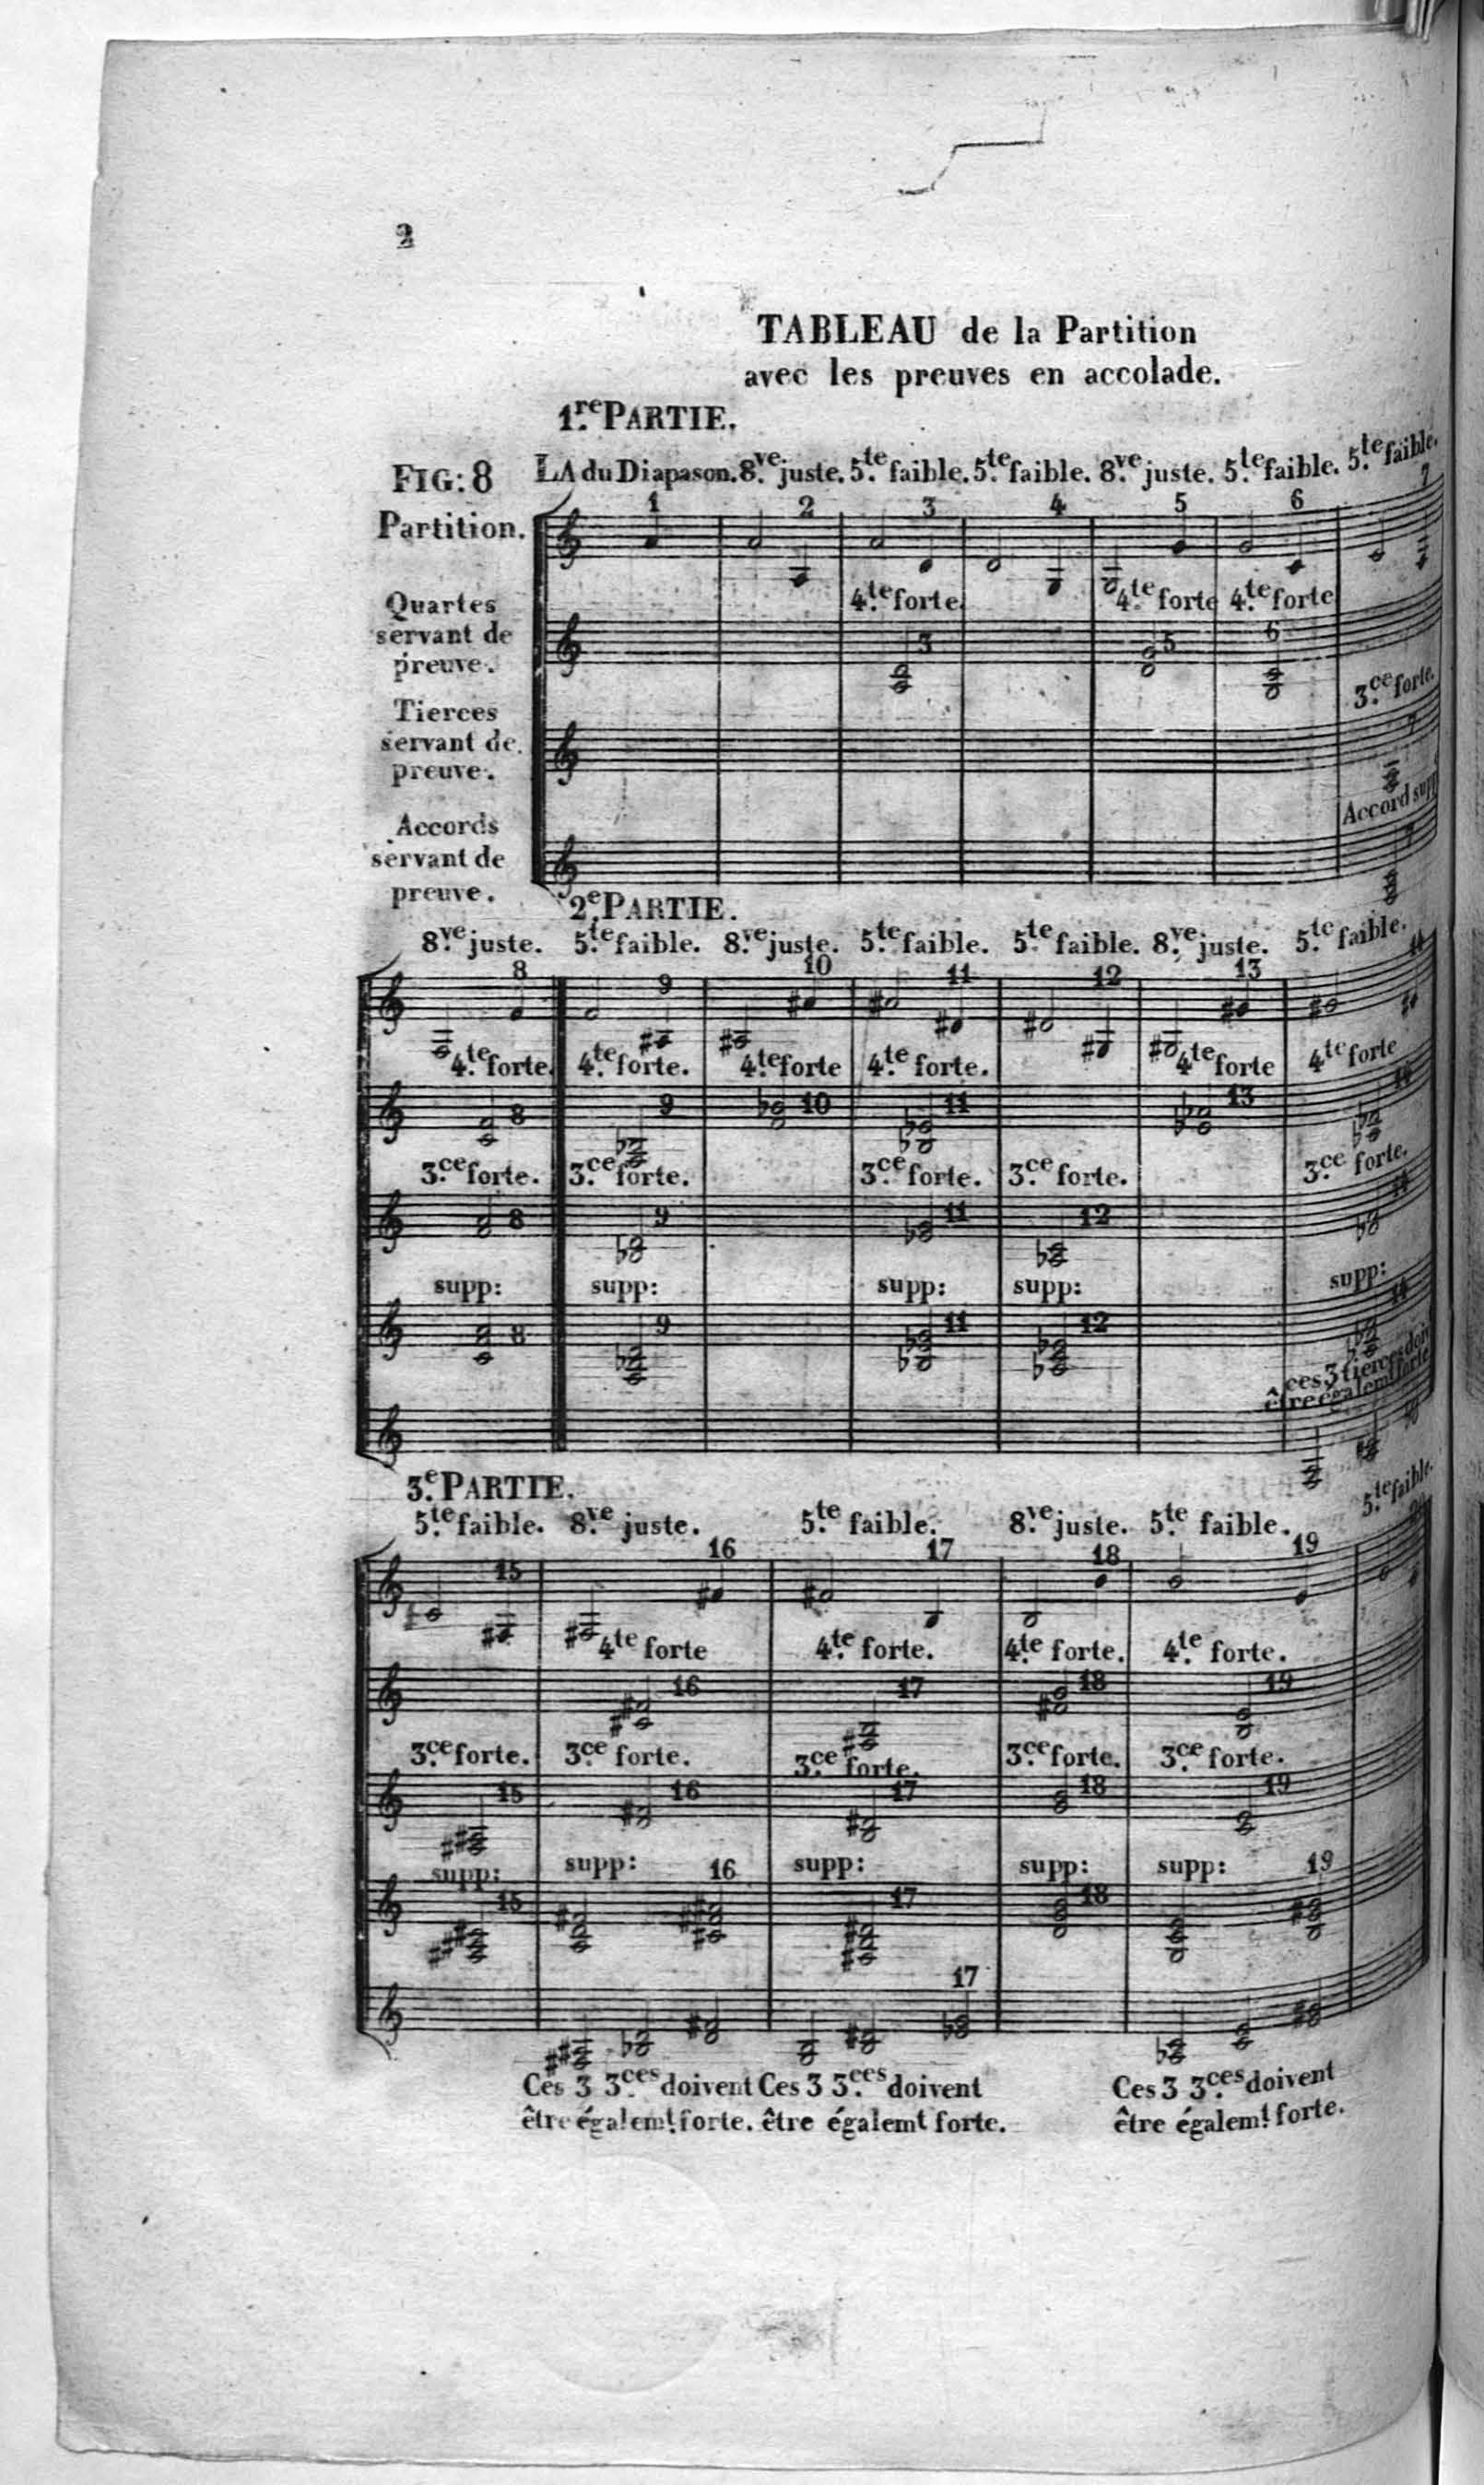
I divide the partition into three parts composed of four fifths each, of which you can find a table in fig. 8, with the proofs in musical staves, labeled with their correct alterations. The first staff gives the fifth to be tuned, the second the fourths to be used as proofs, the third the major thirds, the fourth the chords, and the fifth the successions of three major thirds forming the octave, which are the infallible proofs of a well made temperament. The same number, appearing above each measure, designates, in this table, the interval of the partition and the proofs found beneath, so as to make their relationship clear.
To execute the partition with the proofs contained in the table, you must proceed in the following manner:
1) Place the wedge mute above the two strings which give the A of the tuning fork marked by the number (1) in the partition, and which corresponds to the fourth A of the keyboard, counting from bottom to top. Tune the free string to the fork, or to the pitch you choose. Then remove the mute and tune the second string to the first.
2) Place the mute above the two strings of the A below, marked by the number (2); then tune the free string rigorously just to its octave, already tuned, playing them together several times. Then remove the mute, tune the second string to the first, and play it again with its octave to be sure that it hasn’t gone out of tune.
3) Place the mute above the two strings of D (3), which is a descending fifth to the A of the fork. Tune this fifth rigorously just, after which you will narrow it a little, only so much as to disturb the purity of the fifth by a very light beating. Play the wide fourth (3) A–D, to see if it has the same degree of harshness as the fifth (3) D–A. Then remove the mute, and tune the second string to the one you have just tuned. Play the fifth and its inversion the fourth alternately, to assure yourself once again that these two intervals are tempered equally.[4]
4) Tune the fifth G–D (4), first just, then narrow it to the same degree as the fifth D–A.
5) Tune the octave G–G (5), play the wide fourth D–G (5) alternately with the fifth G–D, to see that both of them have the same degree of harshness.
6) Tune the fifth C–G (6) just, then narrow it to the same degree as D–A; play the fourth G–C alternately with the fifth C–G to be certain that they are equally tempered.
7) Tune the fifth F–C (7) just, then temper it like D–A; play the major third F–A, which must neither be just nor too wide, but tolerable, i.e., wide to the same degree as one of the thirds that form the octave. Then play the perfect chord F–A–C, to judge the sound of those notes together, which must be a bit harsh. This third F–A, produced by the first four fifths, is an important proof to see how well you have done so far: if it is too just, the fifths have been too tempered; if, on the contrary, it is too wide, the fifths have not been tempered enough. You must then, in either case, start over, but first play each of the first four fifths in the following order: D–A, C–G, G–D, D–C, to see if they have been tempered equally, and if the bad result came from too much or not enough alteration of all four of the first four fifths, or only from one of them.
8) Tune the octave F–F (8), play the wide fourth C–F (8), which must have the same degree of falsity as the fifth F–C, then play the six-four chord C–F–A, which must be harsh but tolerable, and in which, the major third, being on top, the ear can judge the degree of alteration better than in the chord F–A–C.
Here ends the first part of the partition. If up to now you have done well, the greatest difficulty has been overcome. You only need to continue, and you are nearly certain to end well.
9) Tune the narrow fifth F-natural–A-sharp, which we call B-flat, play the wide fourth F–B-flat, the wide third B-flat–D (9), and the six-four chord F–B-flat–D, which must have the same degree of harshness as the chord C–F–A (8).
10) Tune the octave A-sharp–A-sharp (10). Play the wide fourth F–B-flat (10).
11) Tune the narrow fifth A-sharp–D-sharp (11), play the wide fourth B-flat–E-flat (11), the major third E-flat–G-natural (11), and the six-four chord B-flat–E-flat–G (11), which must be harsh like the earlier ones.
12) Tune the narrow fifth D-sharp–G-sharp (12), play the wide third A-flat–C (12) and the perfect major chord A-flat–C-natural–E-flat (12), which must be harsh and similar in falsity to F–A–C, the first chord tuned.
13) Tune the octave G-sharp–G-sharp (13), play the wide fourth E-flat–A-flat (13).
14) Tune the narrow fifth C-sharp–G-sharp (14), play the wide fourth A-flat–D-flat (14), the wide major third D-flat–F-natural, and the six-four chord A-flat–D-flat–F-natural (14), harsh like the preceding.
Here ends the second part of the partition, which offers us an infallible and, so to say, mathematical means to assure us if we have done well. This is the series of three major thirds F–A, A–C-sharp, and D-flat–F-natural, which, forming the octave F–F, must be equally wide, and which, played one after the other, must produce exactly the same effect to the ear.
15) Tune the narrow fifth F-sharp–C-sharp (15), play the perfect major chord F-sharp–A-sharp–C-sharp (15), which must produce the same effect as the natural chord F–A–C, and, as a second means of verification, the sixth chord F-sharp–A-natural–D-natural (15), which must be a little harsh but nevertheless very tolerable.
16) Tune the octave F-sharp–F-sharp (16), play the wide fourth C-sharp–F-sharp (16), the wide third D-natural–F-sharp (16), and the six-four chord A-natural–D-natural–F-sharp (16) which must be harsh like the preceding ones, and similar to the other six-four chord D-sharp–F-sharp–A-sharp (16); finally, play, as a general proof, the three wide major thirds F-sharp–A-sharp, B-flat–D-natural, and D-natural–F-sharp, which form the octave F-sharp–F-sharp.
17) Tune the narrow fifth B-natural–F-sharp (17), play the wide fourth F-sharp–B-natural (17), the wide major third B-natural–D-sharp (17), and the six-four chord F-sharp–B-natural–D-sharp (17), similar to the preceding ones, and play again, as a general proof, the three wide major thirds G-natural–B-natural, B-natural–D-sharp, and E-flat–G-natural, which form the octave G-natural–G-natural.
18) Tune the octave B-natural–B-natural (18), play the wide fourth F-sharp–B-natural (18), the wide third G-natural–B-natural (18), and the six-four chord D–G–B.
19) Tune the narrow fifth E-natural–B-natural, play the wide fourth B–E (19), the wide major third C-E, the six-four chord G–C–E (19), similar to the preceding ones, and the other six-four chord B–E–G-sharp (19); Play the fifth (20) A–E, which, being formed by the octave of the first note of the partition A (2) and the last E (19), will naturally be found to be narrow like the others, and which must be tempered just as the others. If this fifth is good, that is the most irrefutable proof that the partition is well made, along with the fact that everything has been done as prescribed. Finally, play the three wide thirds A-flat–C, C–E-natural, E-natural–G-sharp, which form the octave G-sharp–G-sharp or A-flat–A-flat, and which, like the preceding, must be equally tempered. If the fifth A–E is too narrow, the third C–E will be too just, and the third E–G-sharp too wide. If this fifth is too wide, the contrary will take place: the third C–E will be too wide, and the third E–G-sharp too just. In that case you must revisit the last preceding fifths, using the proofs indicated, to try to discover the cause of this error. If you do not succeed, you will be obliged to employ a means that is certain to find it, that I call counterpartition.
Chapter 4
Counterpartition
The counterpartition is a succession of twelve narrow ascending fifths, A–E, E–B, etc., serving to retrace the path of the partition, to come upon the error that was committed, by correcting in each fifth whatever is defective until you have discovered this error.
To execute the counterpartition contained in the table, you must proceed in the following manner:
1) Retouch the A of the fork (1), susceptible to go out of tune, to retune it to its octave A (2).
2) Retouch the fifth A–E (20), tuning the E to the A, i.e., raise it if it is found too low or lower it if it is found too high, until you make that fifth narrow to the same degree as those of the partition, leaving the E here a tiny bit lower than perfect justness. Play the wide fourth E–A (20), which must be as harsh as the fifth A–E (20).
3) Retouch the fifth E–B (19), if it is found to be wrong, tuning the B to the E, so that it will be narrow like the preceding fifth A–E (20).
4) Tune the just octave B–B (18), play the wide fourth B–E (18), which must be as harsh as the fifth E–B.
5) Retouch the fifth B–F-sharp, if it is found wrong, by tuning, as in the preceding fifth, the upper note to the lower, so that it becomes narrow, play the wide fourth F-sharp–B (17).
6) Tune the octave F-sharp–F-sharp (16), play the wide fourth F-sharp–B (16).
7) Retouch the fifth F-sharp–C-sharp (15), narrow like the others, play the wide fourth C-sharp–F-sharp (15), play the major third A–C-sharp (15), which must be wide like those obtained in the partition; Play the chord A–C-sharp–E (15), tolerable and similar, in its harshness, to the first natural chord F–A–C of the partition.
8) Correct any error that you might still find in the fifth C-sharp–G-sharp, tuning it narrow like the preceding, and continue to work as has been indicated, following the counterpartition table point by point until you have made the error disappear completely. Sometimes you will be obliged to continue to retrace your steps up to the first fifth D–A of the partition, and if luck would have it that, by a series of errors committed during the counterpartition, this fifth is found faulty, it will be necessary to start the partition a second time to make this new error disappear. The partition being good, you must complete the tuning of the piano, which will be the subject of the next chapter.
Chapter 5
Tuning of the treble and bass; general verification of the tuning.
The partition being finished, you continue to tune the piano by octaves, taking the notes of the partition as the basis. You begin by tuning the treble, then the bass, after which you should go over the treble again to retune any notes that may have gone out. In old pianos, whose cases are generally not very solid and often give to the pulling of the lower strings, you should begin by tuning the bass before the treble, which will not prevent you from needing to go over it a second time (see fig. 10).
To tune the treble, proceed as follows:
1) Place the mute above the two strings of the C that follows immediately on the highest note of the partition, and which is printed black in the figure, and marked by the number (1). Tune the string that is left free to its lower octave (1), already tuned, and marked by a white note. Play the fifth F–C, marked by a little note, which must be almost just. The rising octaves must be a bit too high as you move upwards, especially in new pianos, which are strung with strong strings and whose trebles go considerably flat. Place the tuning hammer on the next tuning pin, then move the mute above the two strings of the C-sharp (2), tune the unison of C-natural, and replay the octave to assure yourself that nothing has gone out.
2) Tune the free string of C-sharp (2) to its inferior octave printed as a white note. Play the fifth in small notes F-sharp–C-sharp, which should be almost just, remove the mute and place it above the two following strings, of D-natural, tune the unison C-sharp, replay the octave and the fifth as before, to assure yourself of the results.
3) Tune the free string of the D (3) to its lower octave, move the mute two strings, tune the D unison, verify the octave and the fifth, and continue to tune the upper octaves in the same manner, taking care to move the mute two strings each time, never removing it altogether, and to place the tuning hammer on the pin of the string to be tuned before moving the mute, making the octaves always a little wider as you approach the top, i.e., so that the last fifths are nearly just, and to continue widening the last twelve notes marked without their fifths. Having arrived at the last two strings, being unable to place the mute above, leave it below. Tune the highest string, then remove the mute and tune the unison.
Having finished the ascending octaves, you must tune the bass notes by descending octaves (see fig. 11).
To tune the bass notes of this table, proceed as follows:
1) Place the mute below the two strings of the E immediately following the lowest A of the partition, which is a black note in the table, and marked with the number (1). Like all the bass notes, tune the free string rigorously just to its upper octave (1), already tuned, and marked by a white note. Place the tuning hammer on the next tuning pin, move the mute below the two strings of D-sharp (2), tune the unison of E, play the octave to be certain that nothing has gone out.
2) Tune the free string of D-sharp (2) to its upper octave indicated with a white note, remove the mute and place it below the two strings of D-natural (3), and tune the unison of D-sharp. Play the octave to see that nothing has gone out.
3) Tune the free string of D-natural (3) to its upper octave, move the mute down two strings, tune the union of the D, and continue to tune the descending octaves in the same way, always taking care to place the tuning hammer on the pin before moving the mute, which you should move two strings at a time, never removing it altogether. Having arrived at the last two strings, being unable to place the mute below, you leave it above. Tune the lowest string, then remove the mute and tune the unison of that note.
I must warn you that you should tune the wrapped strings with great care, for if you raise them too high and then lower them again several times in a row, you are nearly certain to break them. When, through bad luck, you have raised them too high, to lower them you must pull them strongly or rub them with your fingers, so that you will only need to tune them by raising their pitch.
Having finished the bass, you should retune the treble from C (1), just as you did it the first time. When you have gone through it well, you should verify the general tuning of the piano, by playing chords in all the twelve major keys, using the harmonic circle in four parts contained in figure 12. Having become assured by this sequence of chords that all keys are equally tolerable, you should play a chromatic scale in octaves with your right hand, starting on C (10), to be certain of the tuning of the treble, and play a descending chromatic scale in octaves with the left hand, starting on E (1), to be certain of the tuning of the bass.
Chapter 6
Piano strings, how to replace them
In pianos, the strings of the top and middle are made of iron or brass. In the bass, they are brass, and the lowest are often wound. The iron or Berlin strings are inferior to the steel strings that come from England. In the Berlin strings, the numbers 1, 2, 3, 4, etc. indicate strings becoming thinner, and the numbers 2/0, 3/0, 4/0 designate sizes becoming larger starting at 1.
English numbers follow a more regular pattern. The thinnest strings used is indicated by 7, and the rest, becoming thicker and thicker, are marked by the numbers 8, 9, 10, 11, 12, 13. As for the brass strings, their numbering is the same as that of the Berlin strings above 1.
Approximate relationship of Berlin and English strings:
Berlin Strings English Strings
4 7
3 8
2 9
1 10
0 11
2/0 12
3/0 13
4/0 14
etc. etc.
To replace a broken string, you must use wire marked by the same number you will find next to the tuning pin. The tuning hammer has a little hook on top. You should bend the end of the wire and insert it in the hook to twist the two parts together, so as to make the tail that Is used to attach it. Then you lift the dampers, and attach the tail to the point on the hitchpin rail for that string. Then thread it through the pin of the rail, and cut the string eight inches beyond the tuning pin. Finally, remove the tuning pin by turning it with the tuning hammer. To roll the string on the tuning pin, hold the pin with your left hand on the lower portion at a convenient height. With the right hand place the end of the string along the pin, and wrap the wire over it, so as to hold it strongly with the fingers of the left hand while pulling it taut. With the right hand, take the string again to make three or four turns around the pin, so as to pinch strongly the end that is held by the fingers of the left hand. Roll the pin a few more turns, and break the little end off. Put the pin in place, always holding the string taut. Rub the string with a bit of leather to stretch it, and make it hold its tuning better. Finally, thread the string through the bridge pins and raise it to pitch.
These are the principles that the limits of this small book allow us to explain. Though we have aimed to omit nothing important in these first chapters, nevertheless we have been forced to cover some subjects in a very succinct manner. Those who wish for a more complete understanding, whether of the principles of tuning, or of the interior mechanism of the piano, will be able to make good use of the work we will produce very soon concerning the Art of Tuning Your Piano Yourself.
[1] Makers do not use flat signs to label tuning pins; they only use sharps.
[2] A wide interval is one in which the two tones forming it are a little farther from one another than they should be, whether by raising the upper tone to make it farther from the lower, or by lowering the lower note without changing the upper. For the same reason, a narrow interval is one in which the two tones comprising it are a little closer to one another, whether by lowering the upper note to make it closer to the lower, or by raising the lower note without changing the upper.
[3] Ascending fifths are those in which the upper note is tuned to the lower one; descending are those in which the lower note is tuned to the upper. In all the figures in this work, the black notes indicate the notes to be tuned, and the whites are those that serve as a basis for tuning the others.
[4] In this sequence of fifths, which should be learned by heart, you can see that you often tune up an octave, so that the fifths will remain beside one another in the middle of the keyboard where the strings are less likely to go out of tune.
Henceforth, to shorten the following explanations, I will no longer give detailed instructions concerning the three operations for each unison: place the mute above the two strings, then tune the string that is free, then remove the mute and tune the second string to the first. I will simply say, “Tune the note,” and this will imply these three operations.